May 29, 2022 · 19 min read
The Ins and Outs of Google Meet: The Only Guide You'll Ever Need

Shaimaa Badawi
Virtual meetings have become a necessity in the past couple of years. With the different meeting applications, each individual or business picks their favorite software that caters to their needs.
Google Meet is one of the most popular video-conferencing tools in the market. An integral part of the Google Workspace suite, Google Meet offers numerous options that make virtual meetings collaborative and engaging. In this article, we're going to focus on Google Meet and discuss everything you need to navigate this app and discover its various features.
What is Google Meet?
Google Meet is a premium video-conferencing product and one of the most popular tools in the market. It allows you to have high-quality video meetings using a wide range of features and workspace plans for individuals and organizations, so there's something for everybody.
Why use Google Meet?
One of the prominent selling points of Google Meet is its integration with other Google Workspace apps, which allows this video-conferencing platform to integrate into your regular workflow without hindrance and provides a significant cost-saving advantage.
Its ability to include a large number of meeting participants in one video/audio call is also why many people who host webinars and public events choose this platform. It also provides the flexibility of downloading it to various devices and operating systems so that anyone can join a meeting from anywhere at any time.
So let's dive right into your complete guide to using Google Meet starting from downloading it on different devices to learning how to navigate its various features that facilitate your virtual meetings.
Google Meet download for PC and smartphone
The first step of using Google Meet is to download the app for your desktop and smartphone to access it from any device.
You can use Google Meet on most browsers like Chrome, Edge, Safari, and Firefox. However, the compatibility with Internet Explorer and Opera is not optimal as Google Meet is not fully supported on these browsers.
While you can visit the Google Meet homepage to have your meetings, downloading the web app can make your user experience much better.
Google Meet download for PC
Go to meet.google.com.
1. A window will appear on the top right corner asking you to try the Google Meet web app.
2. Click "Install."
3. The Google Meet desktop app is now installed on your device.
Google Meet download for smartphone
1. Go to the Play Store or Apple Store on your smartphone.
2. Type "Google Meet" in your search bar.
3. Click "Install."
4. The Google Meet smartphone app is now installed on your phone.
Here's a Google Play link to download and install Google Meet for Android smartphones and tablets.
And this is the App Store link to download and install Google Meet for iPhones and iPads.
With the Google Meet app now installed on your devices, let's discover how to create an account.
How to create a Google Meet account?
To use Google Meet, you can simply log in with your existing Google account and then go to the Google Meet homepage.
Once signed in, you can go to meet.google.com or click the dotted square icon on the top right corner of your Chrome browser, and then choose the "Meet" button in the list to go to Google Meet.
If you don't already have an account, you need to sign up first.
1. Type meet.google.com in your address bar to open the Google Meet page. You'll find a "Start a Meeting" button that will direct you to the sign-up page to create a Google account or you can simply click the "Sign up for free" link on the page.
2. Fill in the form with your first and last name, email, and password; retype it to confirm and then click "Next."
3. A six-digit verification code will be sent to your current email, so go to your inbox to copy the verification code, paste it into the sign-up page, and click "Verify."
4. You'll be asked to verify your phone number for security; add your number, wait for the verification code on your phone, then copy and paste it like before, and click "Verify."
5. Continue the steps by adding your personal details like gender and birthday, and click "Next."
6. Finally, you'll be asked to agree to the terms of service by clicking the "I Agree" button.
After creating your Google account, you can now start a new meeting or join a current video call.
How do I use Google Meet?
1. Start a meeting
To start a meeting, go to the Google Meet homepage on your desktop or open the iOS or Android app on your smartphone.
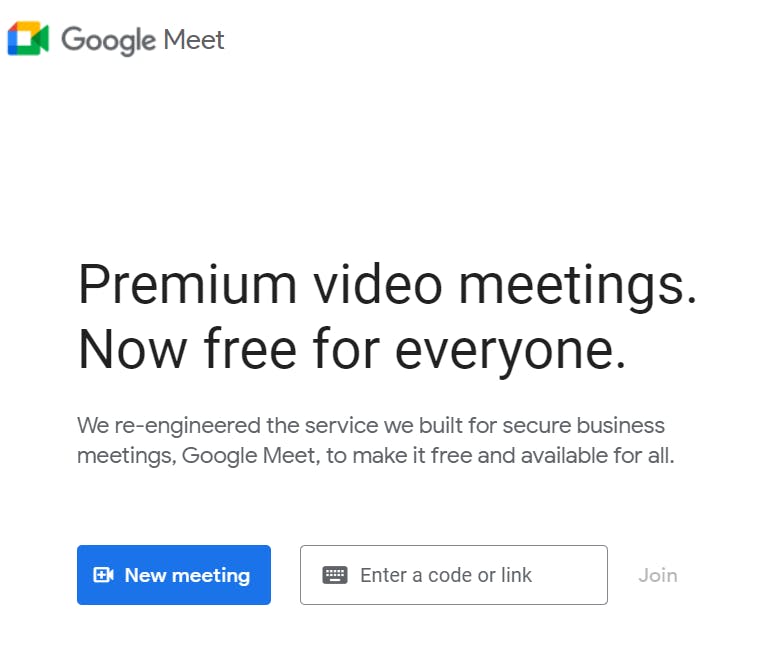
You'll find two options: "New meeting" or "Enter a code or link" that somebody sent you to join their meeting.
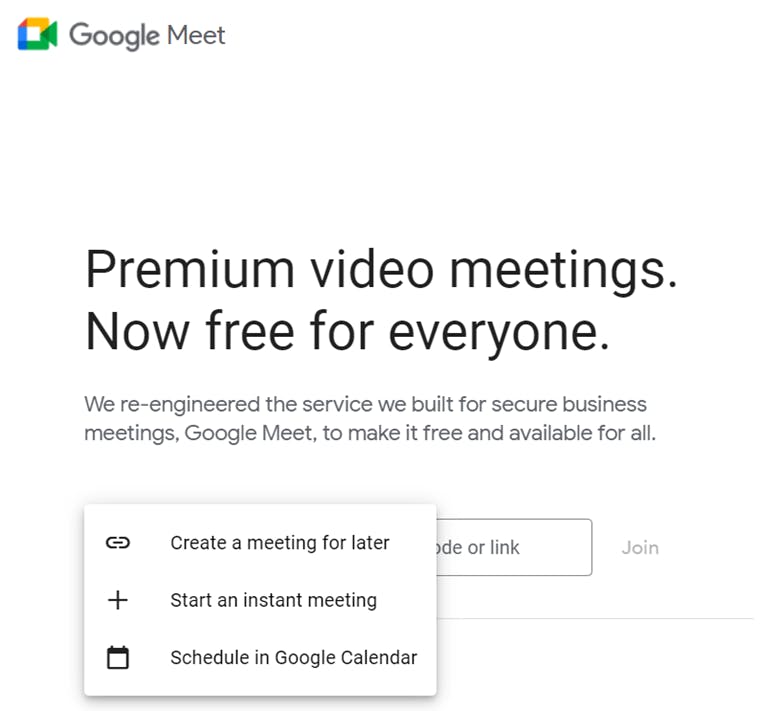
If you click on "New meeting," a drop-down menu will open to either start the meeting instantly, create one for later, or schedule it in Google Calendar.
Alternatively, you can also start or join a meeting from your Gmail account where you'll find the "Meet" option on the left column.
2. Allow camera and microphone access
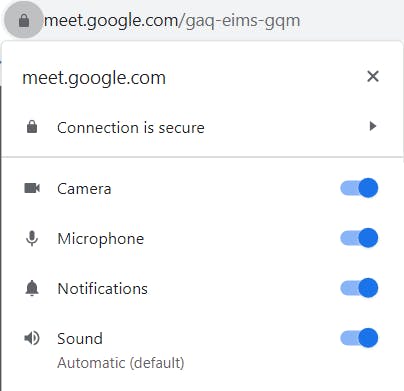
Once you start a meeting, a notification window will appear to remind you to allow access to your camera and mic.
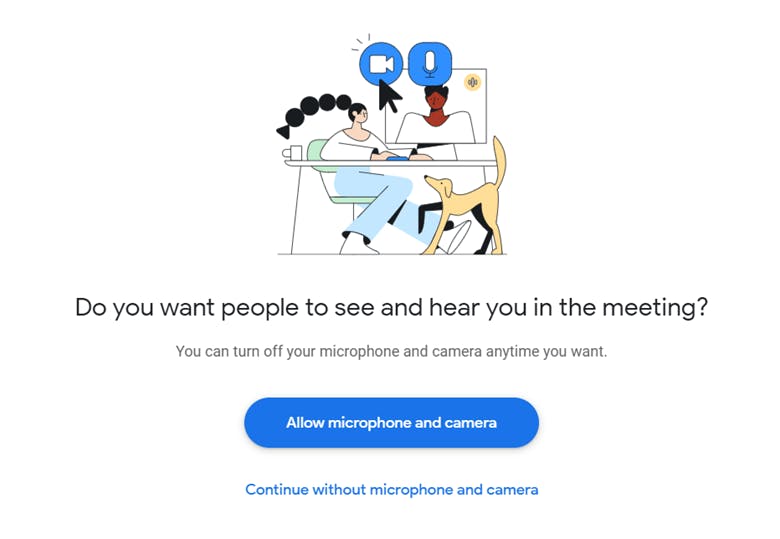
If you're using the app on your smartphone, ensure your permissions and privacy settings are turned on to use your camera.
If your camera or microphone is blocked, click on the lock icon on the top left in the address bar.
3. Add people to the meeting
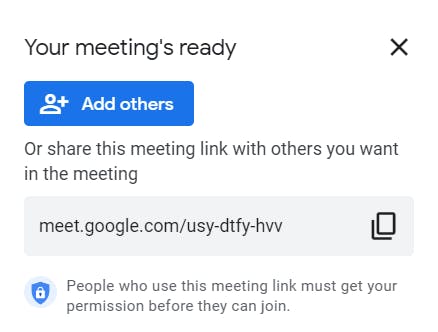
Another window will appear to enable you to add other people who are already saved on your Google account's contact list or you can copy the Google Meet link and send it via email.
Now you know how to start a new meeting; what about joining one?
How do I join a Google Meet online?
To join a Google Meet, go to meet.google.com and click on "Enter a code or link" and add the code that was sent to you by the meeting's host.
If you want to join via your Gmail account, click on the "Join a meeting" icon and paste the meeting code.
You're now all set to start or join a meeting instantly; let's find out how to schedule one on Google Calendar for a later date.
How to schedule a Google Meet on Google Calendar?
You can schedule your meeting on Google Calendar to give people a chance to prepare for the meeting and clear their schedules.
1. Go to the Calendar icon by clicking the dotted square icon on your Google Chrome browser's top right corner.
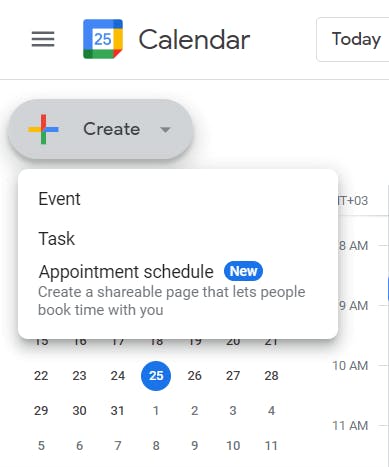
2. On the top left corner of your calendar, you will find the "Create" button; click on the drop-down list to choose "event."
3. A window will appear to add your event's details like the meeting's title, date, time, guests, location, any additional description for the meeting, and file attachments like the meeting agenda or presentation.
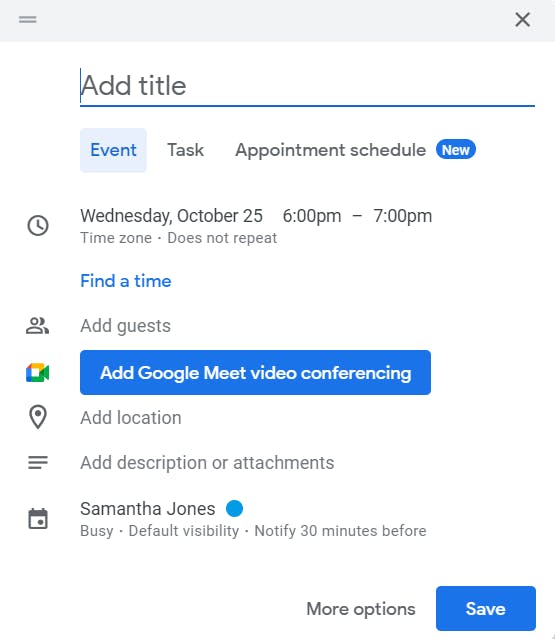
4. Save the changes to create the event.
5. Another window will appear asking whether you want to send the invitation emails to the guests you added to the event. Once you click "Send," everyone will get an email with the meeting code that they can use to join your meeting.
The Google Meet app offers options for individuals, students, and small and large businesses, each with different plans and pricing, which brings us to the next point.
Is Google Meet free?
When you log in to the Google Meet homepage, you'll find the "Plans & Pricing" tab on the top left side. Click on it to reveal the 3 plans available: Google Meet, Google Workspace Individual, and Google Workspace Enterprise.
Google Meet is free of charge and Google Workspace Individual is for $7.99 per month. As for Google Workspace Enterprise, the price varies, so click on "Contact Sales," which will lead you to a form to fill in your contact details, company details, and required inquiry.
Google Meet and Google Workspace Individual allow you to include up to 100 attendees in a single meeting, while Google Workspace Enterprise allows up to 500 attendees in one meeting.
All three plans allow you to have an unlimited number of meetings, but what about the meeting duration?
What is the time limit for Google Meet?
Google Meet allows a maximum of 1 hour per meeting that includes 3 or more people. However, if you're having a one-on-one meeting, you can have it for up to 24 hours.
As for Google Workspace Individual and Google Workspace Enterprise, they both allow a maximum of 24 hours for both one-on-one and group meetings.
Since we've mentioned Google Workspace Individual and Enterprise plans, we can't miss mentioning Google Workspace, formerly known as G-Suite.
What is Google Workspace?
Google Workspace combines various tools created by Google like Gmail, Google Meet, Google Chat, Google Calendar, Google Drive, Google Sheets, and more.
If you have a Google Workspace account, you can use it to log into Google Meet and join meetings.
However, if your account is linked to an enterprise, you may not be able to create a meeting through your Google Workspace account unless your company's admin gives you access to the Google Meet feature.
Google Workspace has additional pages dedicated to nonprofits, developers, and education. Its basic standard use is free, so you can simply log in with your Google account to use its different features.
What are Google Meet's features?
The Google Meet app offers a wide range of free features that anyone can use in their meetings, in addition to more features reserved for Google Workspace customers either individuals or enterprises.
Let's take a look at Google Meet's free features:
1. Unlimited meetings
Google Meet offers an unlimited number of meetings with a maximum of 100 participants in a single meeting for free users. We've already established how to invite people to a meeting; you can also add or remove people during the meeting as follows:
How to add people during a Google Meet meeting?
1. Click the "People" icon on the bottom right and then "Add people."
2. Type the person's name or email, and then click "Send email."
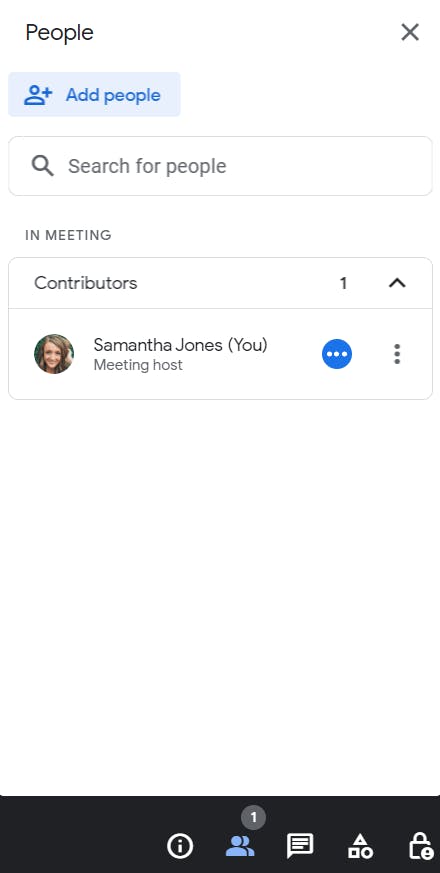
The person will receive an email with a direct link to the meeting to join it in progress. When they click on the meeting's link, a request will be sent to the meeting organizer to admit or deny that person in the meeting.
How to remove people during a Google Meet meeting?
Sometimes, you may add some people by mistake; to remove them during a meeting:
1. Click the "People" icon on the bottom right.
2. Find the person you want to remove from the meeting; then, click the horizontal dotted line or the "More actions" icon and choose remove from meeting .
How to admit people in bulk in Google Meet?
If you want to host large meetings, like conducting a company meeting or giving a class to many students, you can add people in bulk. As the meeting organizer, you'll be able to admit or deny access to people as follows:
1. Choose "Admit" or "Deny entry" when somebody requests to join the meeting.
2. You can find out who wants to join by clicking "View all" and then choosing "Admit" or "Deny" next to each person's name. Alternatively, you can choose to "Admit all" or "Deny all" to allow or deny access to everyone.
How to end a Google Meet meeting?
1. Once the meeting is finished, click on the "Leave call" icon at the bottom.
2. A window will appear asking you to either "Just leave the call" to leave it individually but keep the meeting going for other participants or "End the call for everyone" to end the meeting.
2. Real-time captions during the meeting
One of the cool features of Google Meet is the Google speech-to-text technology to generate live captions in real-time.
The Google Meet app allows you to use captions in different languages like Portuguese, Spanish, German, and French depending on your region; let's see how to navigate this feature on the Google Meet app:
1. To activate live captions during a meeting, click the "Turn on captions" icon at the bottom.
2. Click "Turn off captions" to deactivate this feature.
3. To change the language, click the "More options" icon at the bottom, "Settings," and then "Captions" on the left column and change the language from the list. The app now will only recognize the chosen language and display the live captions as you speak.
3. Video and audio test run
We all want to look presentable during a meeting and many people would usually turn on the camera on their laptops to check how they look before a meeting.
1. Google Meet offers the option of previewing a meeting before it starts to test how you look and sound on a video call. Here's how it works:
2. Join a meeting using the Google Meet link sent to you via email.
3. A preview of the meeting will appear with three tabs at the bottom to check your mic, speakers, and camera, with the ability to record a test sample to check your audio and video.
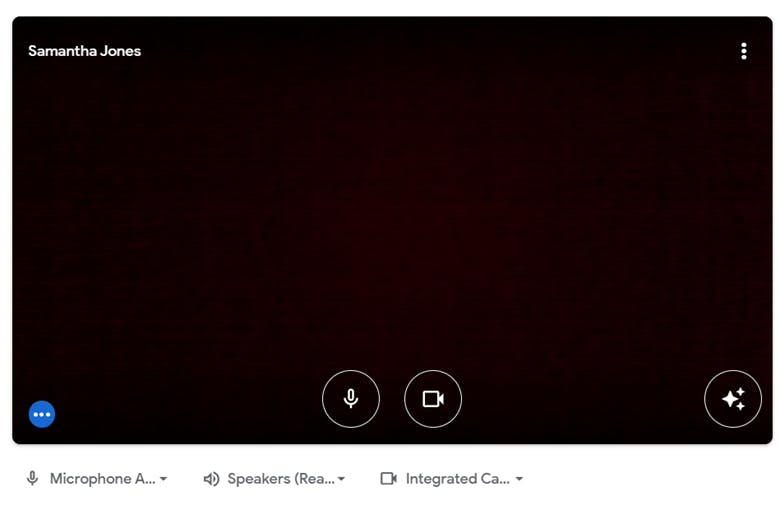
5. Click on the camera tab, and then choose "Make a test recording" to record a sample video of yourself to see how you'd look and sound in the video call.
6. Click "Capture & diagnose" to start your recording.

7. After you're done, play the recording to see how you sound in the video. You'll find a diagnostics column on the right testing your mic, camera, speaker, and connection results in the sample video.
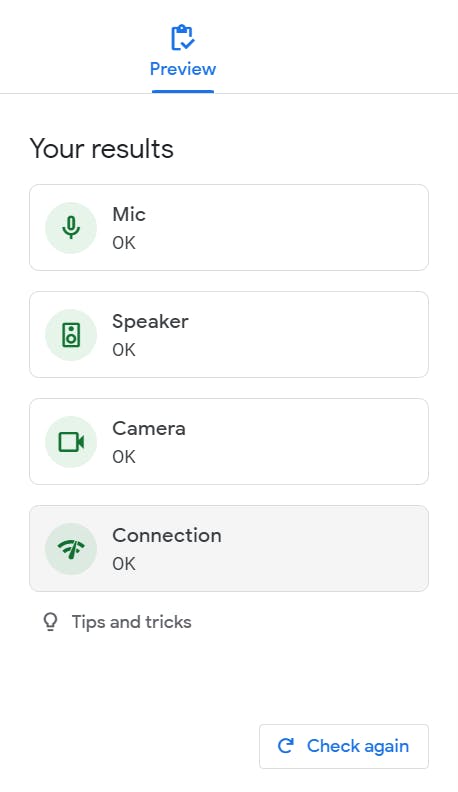
8. You can record sample videos as much as you like by clicking the "Check again" icon on the bottom right corner until you're satisfied with the results before joining the meeting.
4. Layouts and self-view settings
How to change your layout on Google Meet?
Google Meet can recognize the most interactive participants during the meeting and display them accordingly. It also gives you the choice to focus on a specific number of participants by changing the layout settings in the meeting:
1. Click the "More options" icon on the bottom and then "Change layout."
2. You'll find four options: Auto, Tiled, Spotlight, and Sidebar.
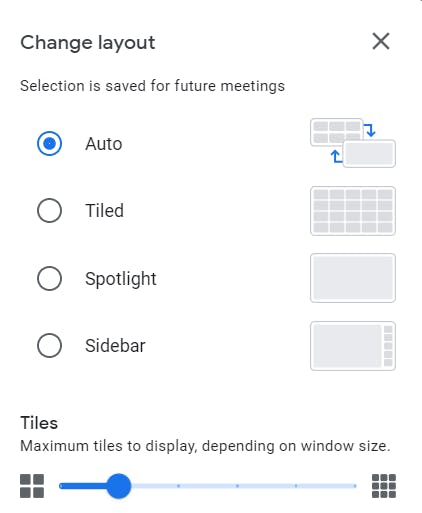
(a) Auto has a default of 9 tiles on the screen and chooses the most relevant content and active participants in the meeting.
(b) Tiled has a default of 16 tiles on the screen and can display up to 49 people at the same time.
(c) Spotlight gives the main speaker or shared screen the priority and only shows them on the whole screen.
(d) Sidebar gives the majority of the screen to the main speaker with a few participants appearing on the side.
3. Once you choose a layout, the change is automatically saved.
Pro Tip. To make sure the layout feature is working optimally, it's best to close any unneeded tabs in your browser or apps running in the background to avoid video freezing.
You can also choose a layout setting with fewer tiles or turn off your camera for a while until the issue is resolved.
How to manage self-view settings?
If you're hosting a 1:1 meeting, your self-view window will be set by default at the bottom right corner. If a third person joins the meeting, your window will be added to the tiles on the screen as a participant. You can change these settings as follows:
1. Move your mouse cursor on your self-view window; you'll find 3 options: pin yourself to your main screen, show in a tile, and minimize .
2. If you choose the pin option on your self-view, your tile will appear bigger than everyone else's and the other participants will appear in smaller tiles next to you.
You can pin any participant in your meeting or unpin them by clicking the unpin icon .
If you're hosting a large meeting and want to pin a participant on your screen, click on the "People" icon at the bottom right corner. Type the person's name in the search bar for easy access and then click on the "pin" icon next to their name.
3. If you click "show in a tile," your self-view window will appear as another tile next to the participants.
4. To remove your self-view from a tile, click remove this tile . This change will return your self-view to the bottom right corner.
5. You can move your floating self-view window by clicking on it and dragging it to any place on the screen.
6. If you click on "minimize," your self-view window will only be minimized on your screen but will still appear to others.
7. You will find another option over each participant's tile to remove them from the call.
Additional screen settings
1. To turn on full screen, click on "More options" and then choose "Full screen." Click "Exit full screen" to turn it off.
2. You can change the background of your screen by clicking "More options" , "Apply visual effects," and click any of the background options, upload an image, or choose to blur your background either slightly or fully.
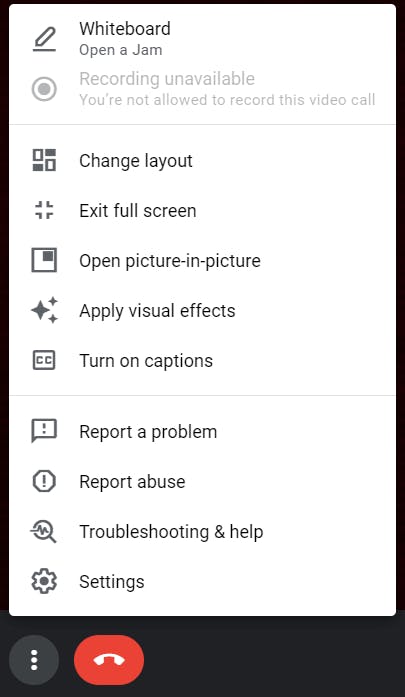
This option is particularly useful if there are people in your background who don't want to appear or if you simply don't want to show your background.
3. Any participant can choose to mute themselves and/or turn off their camera before or during the meeting. Click on the "Mute" icon or the "Turn off camera" icon before joining the meeting or during the meeting at any time.
5. Meeting host controls
How to mute participants in Google Meet?
As the meeting host, you can mute any participant in the meeting but can't unmute anyone, even if you muted them in the first place, due to the privacy settings.
Muting a participant is sometimes necessary to cut out their background noise during the meeting. You can choose to mute one person, several people, or everyone in the meeting.
1. Move the cursor to a person's image on the screen, and then click "Mute" . A window will appear asking you to mute the participant and mentioning that you won't be able to unmute them.
2. If you're in a large meeting and the person's image doesn't appear on the screen, click on "People" , then search for the person's name, and click on the "Mute" icon next to the name.
3. To mute all participants, click on "People" and then "Mute all."
How to share your screen in Google Meet?
You can use screen sharing features in your meeting by clicking on the "Present now" icon at the bottom. You'll find 3 options: your entire screen, a window , or a tab .
1. If you choose to share your entire screen, a window will appear to request screen sharing. Click on the displayed screen in the window and then share. The participants will be able to see everything you do on your screen.
2. If you want to share only one window, you can choose any window open in your background even if it's not in Google Chrome. The participants will only be able to see the selected window and any tabs open in that window and won't see other windows even if you toggle between them.
3. If you choose to share one tab only, it has to be on Google Chrome. This option is recommended for sharing a video animation. A window will open with a list of open tabs and a checkbox at the bottom to share tab audio.
4. To stop screen sharing, you can click the "Stop sharing" blue button at the bottom of your screen or go to your meeting and click on the "Present" icon and then "Stop presenting."
5. Any participant can present their screen even if someone else is presenting by clicking "Present" and then "Share now."
The other presentation will be paused until someone else interjects with a presentation or the presenter stops sharing their screen.
6. A participant can choose to present before the meeting without appearing to the participants at all by clicking "Present" instead of "Join now."
The meeting host can also start the meeting and then choose to share the screen before admitting anyone to the meeting.
Additional host management controls
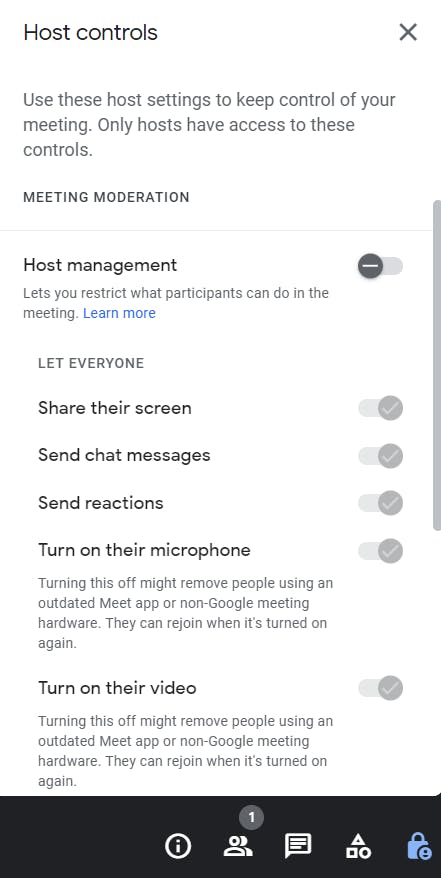
1. The meeting host can block any participant from sharing their screen by clicking the "Host controls" icon in the bottom right corner and disabling "Share their screen."
2. You can also turn host management on or off to allow anyone to add, remove, or mute participants, record the call, and use any hosting features in the app.
You'll be able to manage permissions for chat messages, microphone, and video from this tab as well.
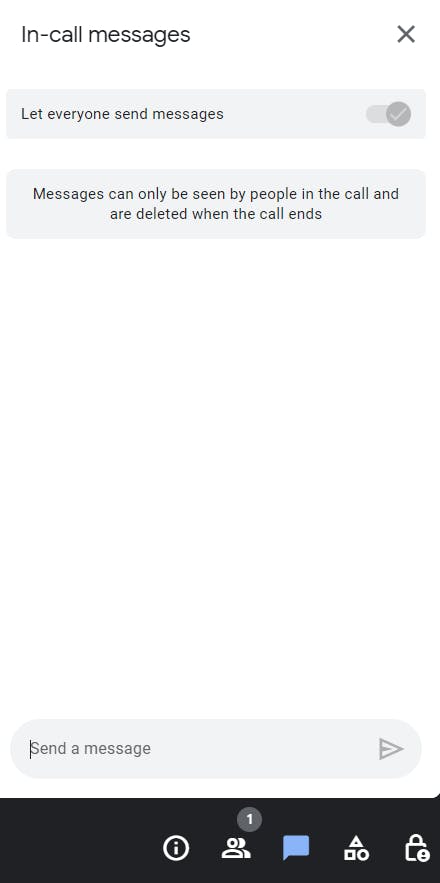
3. To send a message during a meeting, click on the "Chat" icon at the bottom right corner. Anyone can send messages in the chat if the meeting host allows it by activating the "let anyone send messages" option.
6. Activities
1. When you click on the "Activities" icon at the bottom right corner, the whiteboarding feature will appear in the sidebar.
2. Once you click on it, you'll have two options to choose from: start a new whiteboard or choose an existing one from Drive.
3. A Jamboard will appear in a new tab and all the participants will receive a link in the in-call chat to access this feature.
4. Everyone should be able to edit the Jamboard simultaneously as long as they were in the calendar invite and are part of the same organization.
This feature is useful in brainstorming sessions and for participants to share their thoughts creatively in a shared whiteboard that mimics a physical one.
5. If someone doesn't have permission to edit, you can click on the "Share" tab on the top right corner of your Jamboard, type the person's email, and then click "Done."
Make sure to choose the "Change to anyone with the link" option at the bottom of the "Share with people and groups" window.
6. The Jamboard has many useful features including pen, eraser, select, sticky note, add image, circle, text box, and laser pointer on the left sidebar.
7. You can set a background pattern for your Jamboard, clear the frame, create multiple slides, and present the Jamboard to the meeting.
8. After you're done, you can rename your file, download it as a PDF, save it as an image, remove, or make a copy of the file, and save it to your Drive.
Any standard user can log into Google Meet and enjoy these features right away. Google Workspace Individual and Enterprise users have access to more advanced features but those subscribed to the enterprise plan get the lion's share of Google Meet's features.
Although this article focuses solely on Google Meet, let's find out some of Google Workspace's advanced features to give you an idea of what it offers.
What are Google Workspace's features?
In addition to all the free Google Meet features, Google Workspace subscribers have access to additional features to use in large company meetings or Google classroom.
If you want to find out how to use these advanced features, click on each link that will redirect you to the Google Workspace Learning Center.
Availability: Google Workspace Individual ✅ Google Workspace Enterprise ✅
2. Noise cancellation
Availability: Google Workspace Individual ✅ Google Workspace Enterprise ✅
3. Dial-in phone numbers
Availability: Google Workspace Individual ✅ Google Workspace Enterprise ✅
4. Breakout rooms
Availability: Google Workspace Individual ✅ Google Workspace Enterprise ✅
5. Hand Raise feature
Availability: Google Workspace Individual ✅ Google Workspace Enterprise ✅
6. Conducting polls in a meeting
Availability: Google Workspace Individual ✅ Google Workspace Enterprise ✅
7. Holding Q&As during the meeting
Availability: Google Workspace Individual ❎ Google Workspace Enterprise ✅
8. Tracking attendance
Availability: Google Workspace Individual ❎ Google Workspace Enterprise ✅
9. Live streaming
Availability: Google Workspace Individual ❎ Google Workspace Enterprise ✅
💡You can enjoy all Google Meet's features and integrate with your favorite communication and project management apps like Jira, Asana, Trello, Slack, Microsoft Teams, and much more using the one and only all-in-one meeting management platform, adam.ai.
Google Meet and adam.ai integration
You can use adam.ai to sync with Google Meet, Calendar, Drive while having a space to create action items, make decisions in a meeting, share your meeting agenda with the attendees, and do it all in one platform.
And while there may be multiple meeting management solutions available, here is why adam.ai is the all-in-one meeting management platform you can trust:
- adam.ai is one of Atlassian Ventures' portfolio companies.
- In the meeting management software category on G2, adam.ai has been ranked a leader and a high performer for successive quarters in the past years.
- adam.ai has been included in the Forrester Report in the AI-enabled meeting technology landscape.
- adam.ai is trusted and used by powerful teams and organizations worldwide for all types of critical meetings, like board, committee, project management, and business development meetings.
- And most importantly, adam.ai integrates with your existing workflow, is SOC2 compliant, provides dedicated support and success, and has a free trial option.
Bonus. We've recently released "The Future of Meetings Report," where over 490 experts from various industries share their insights on challenges and AI in meetings!
Transform how you conduct critical meetings—From meticulous preparation to effective execution and insightful follow-up, adam.ai integrates comprehensive analytics, full customization, and intuitive interfaces with powerful meeting management tools.
Easy onboarding. Enterprise-grade security. 24/7 dedicated support.
The bottom line
In today's world, virtual meetings are a cornerstone of professional individuals and large enterprises. This article is a comprehensive guide on everything you need to do to use Google Meet from creating an account to using its basic features.
We recommend checking out Google Meet's integration with adam.ai, the all-in-one meeting management platform that manages your entire meeting lifecycle before, during, and after meetings.
Subscribe to adam.ai blog
Stay ahead with the latest insights—get our newest blog posts, tips, and updates sent straight to your inbox.